How to Create Individualized Exercise Profile in Strength Training? Part 4: Velocity/Exertion Profile
Previous parts
How to create individualized exercise profile in strength training? Part 1: Testing
How to create individualized exercise profile in strength training? Part 2: Load/Velocity Profile
How to create individualized exercise profile in strength training? Part 3: Rep-Max Profile
Part 4: Velocity/Exertion Profile
In the previous installment, we dealt with the creation of an individualized rep-max profile. In this part we will deal with one concept that I like to call Velocity/Exertion.
I am pretty sure NO ONE has ever written about it before – nor in books, nor in research papers, nor it online blogs and forums (if someone did, please correct me). I have accidentally stumbled on it by playing with the data from Izquierdo et al. Effect of loading on unintentional lifting velocity declines during single sets of repetitions to failure during upper and lower extremity muscle actions (read more HERE and HERE). In a matter of seconds I will show you how I did it.
I will repost the testing data for your consideration.
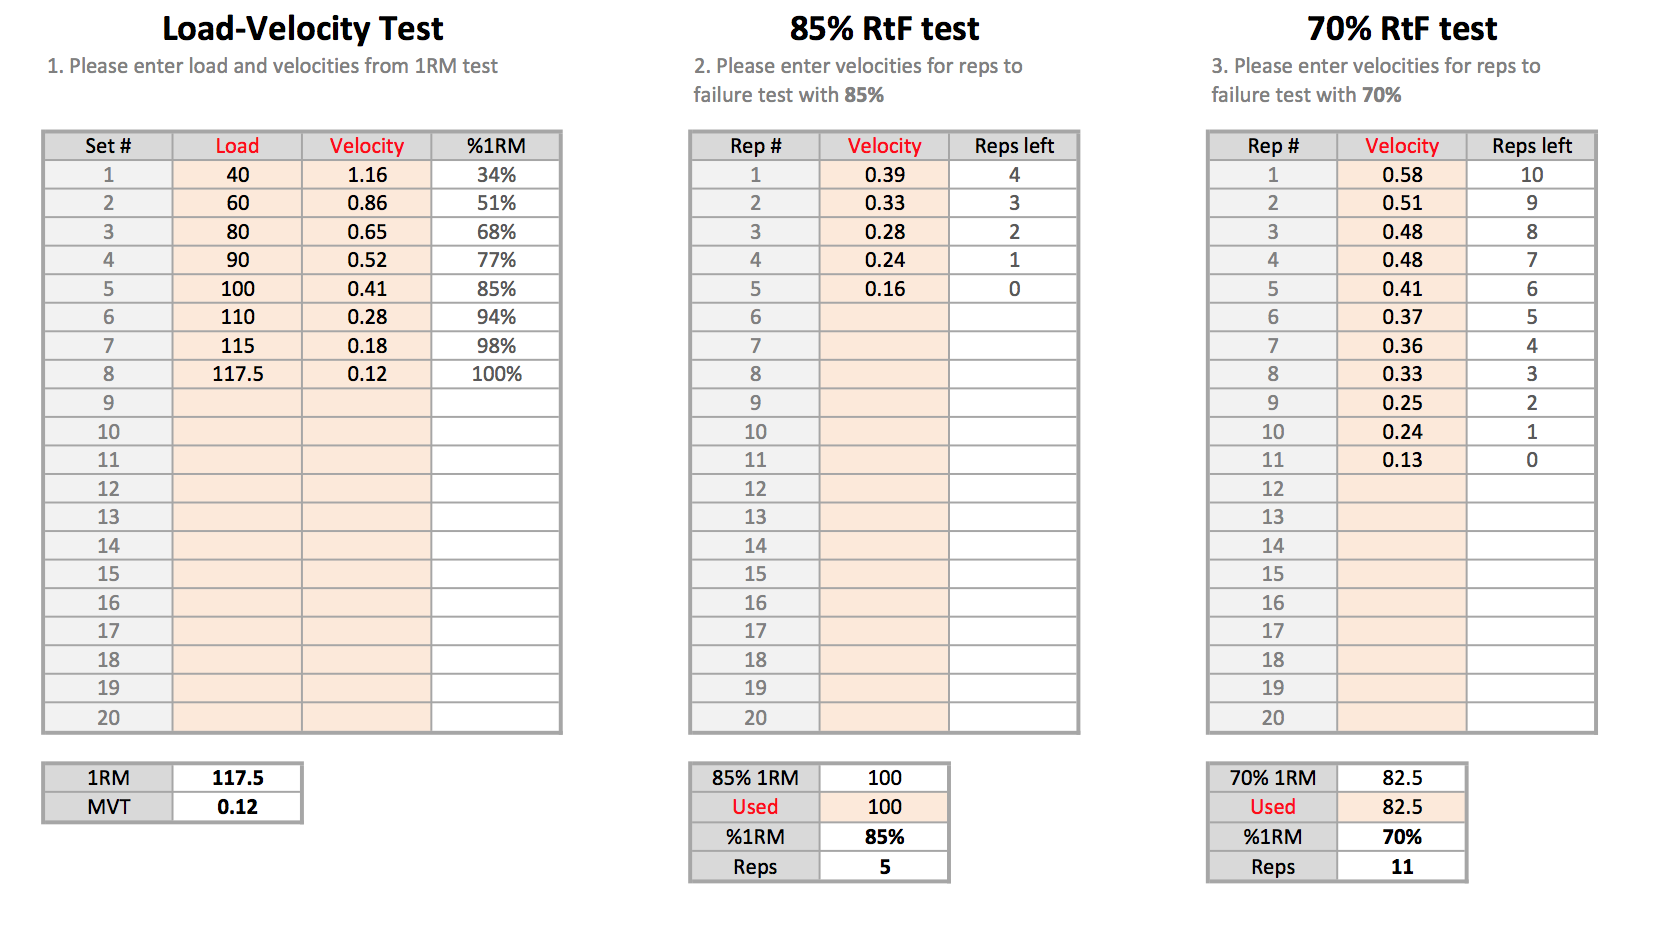
Mladen’s performance
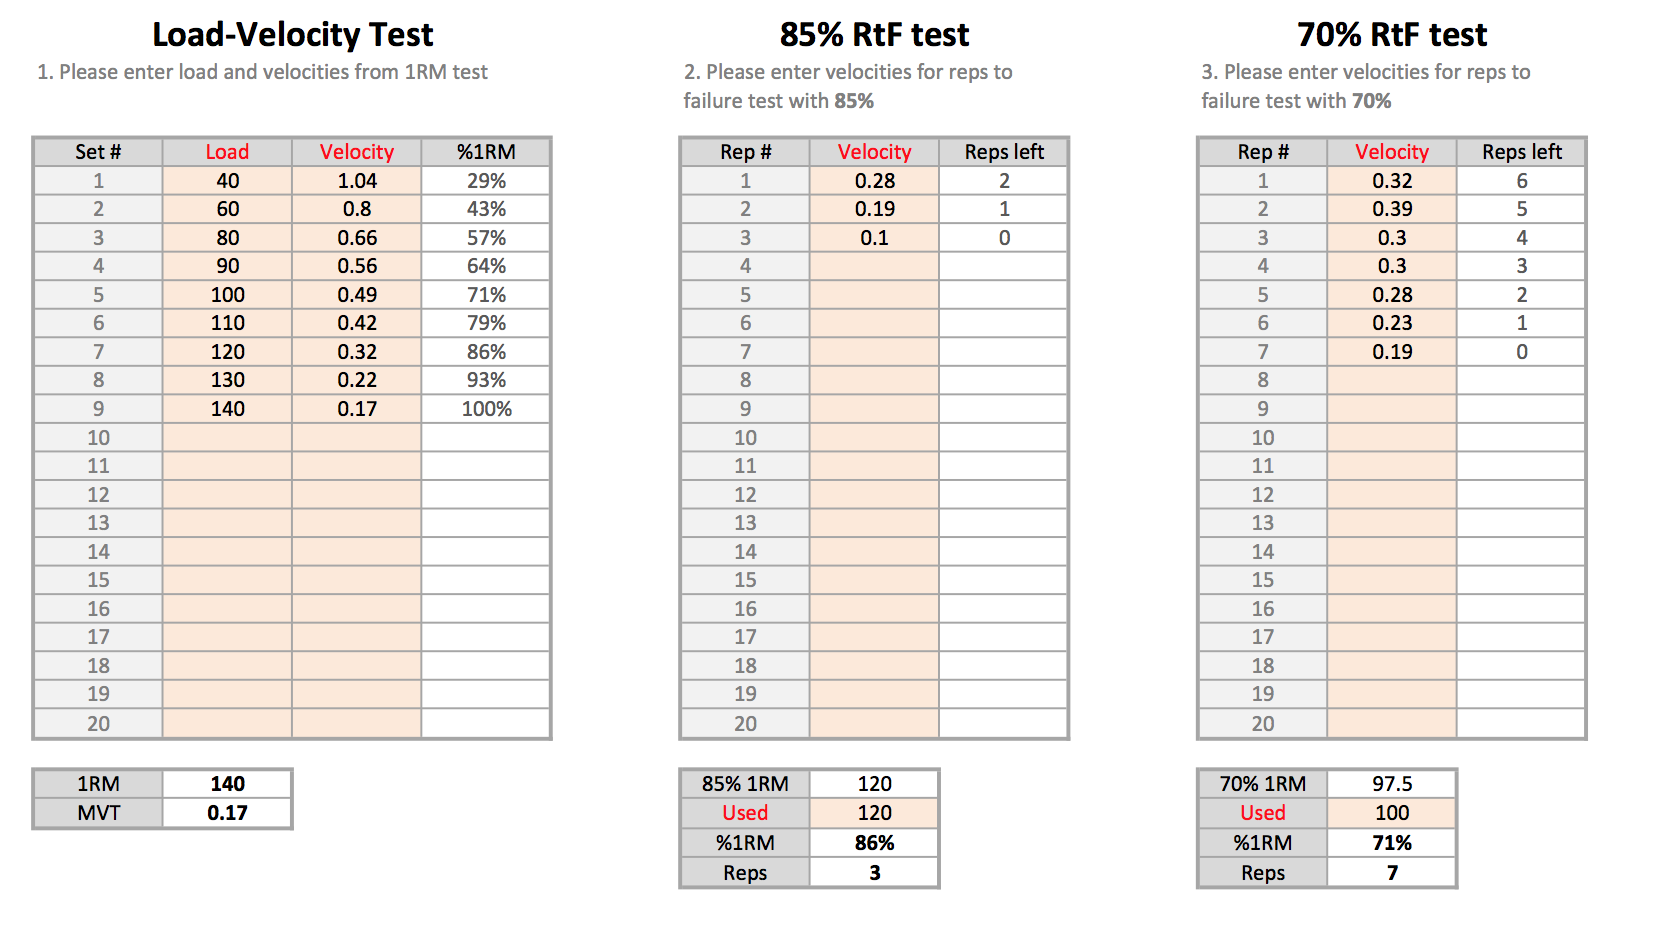
Ivan’s performance
Taking the velocities from 85% and 70% RtF test (test to failure, in this case, pause bench press with the aim to lift every rep as fast as possible) we get the following graph.
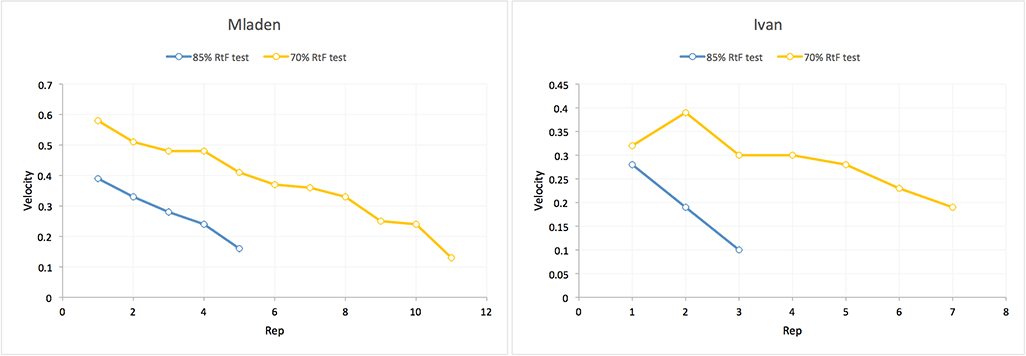
What can we see from the graph? The first rep is the fastest, and then each rep gets slower until the last rep hits MVT (minimal velocity threshold) or pretty much close to it (Mladen 0.12 m/s; Ivan 0.17 m/s).
It can also be seen that Ivan had a less straight curve and a bigger difference in velocities between his last reps with 85% and 70%. This might be due to fatigue from the missed 1RM attempts beforehand and inexperience with using CAT (compensatory acceleration training) and pause bench (he usually does touch and go, also not going all the way down to the chest).
Anyway, the similarity between last rep velocities with different loads used (%1RM) and MVT have been shown in the above study by Izquierdo et al.
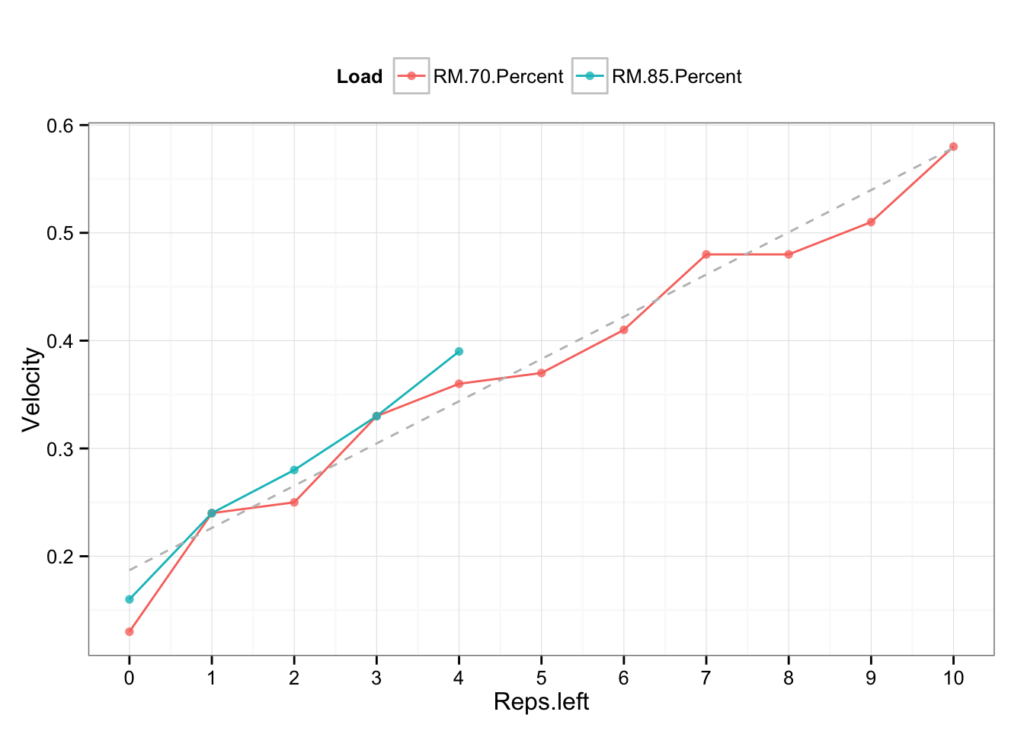
What if we ‘normalize’ the sets, and instead of rep number on the x axis, we show reps-to-failure (or reps left in the tank)?
Check the table below (I will use my own example, since Ivan’s curves are bit off (they are available on the Excel workbook that can be downloaded) :

What can be seen is the similarity between velocities associated with a given reps-left-in the tank REGARDLESS of the load being used. This opens a lot of possibilities, namely using rep velocity (with the assumption that they are performed with the highest effort) to estimate how close to a failure we are. Hence, we can prescribe STOP VELOCITY to control proximity to failure (or in other words exertion level). This is the basis of the Load/Exertion profile. It will be even clearer once we finish up with the complete table.
The mean column is the mean velocity between 70% set and 85% set rep velocities. The difference is the difference between the rep-left-in-the-tank at 70% and 85% and as you can see, in my case the difference is pretty low. That’s why one can use ‘mean’ between them. We will use this mean line to estimate STOP VELOCITY, or Load/Exertion profile, using simple linear regression.
Together with using START VELOCITY from Load/Velocity profile and STOP VELOCITY from Load/Exertion profile one can finalize a velocity-based approach to load prescription.
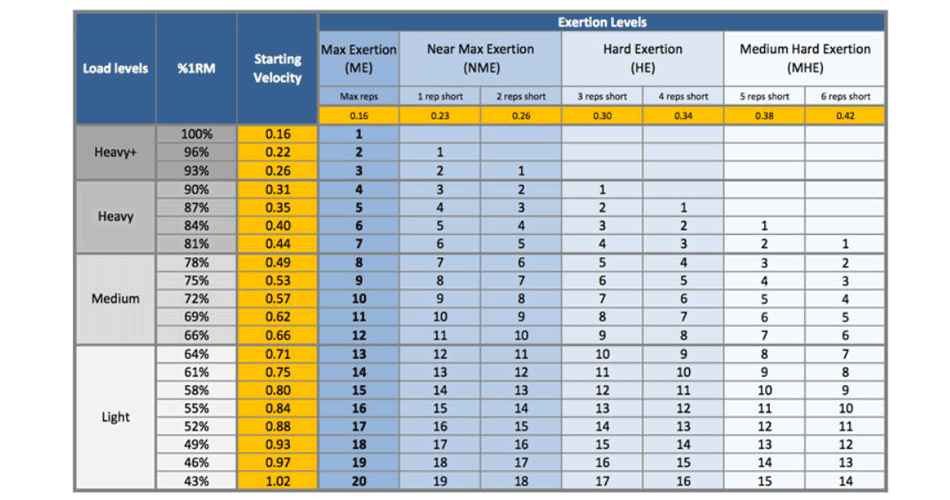
Now we can finally blend everything into a neat individualized Load/Exertion and Velocity/Exertion table.
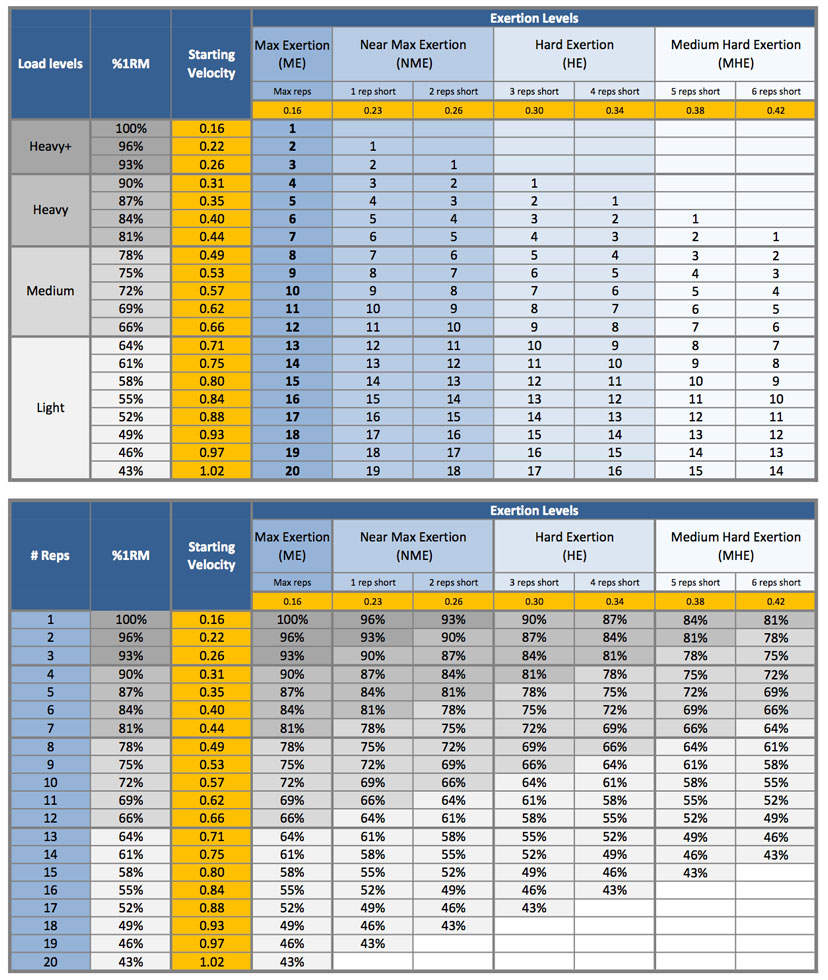
The two tables above are the variation of the same table. In this case, you know the goal reps (e.g. sets of 5) and you are wondering what percentage of 1RM you should use for a given Exertion level (proximity to failure), then you can use the second table. If you know the goal %1RM that needs to be used (e.g. 80%) and you are wondering what number of reps you should be doing for a given Exertion level, then use the first table.
The orange column (vertical) represents STARTING VELOCITY and it is created by using linear regression from Load/Velocity table/profile. Using that table we can estimate initial velocity (first rep) associated with a given %1RM. There are some differences (i.e. my MVT with 1RM test is 0.12m/s and here is 0.16m/s), but they are because of the deviation between ‘real’ values and linear model, and since the correlation is really high (almost perfect), they are negligible.
The orange row (horizontal) represents STOP VELOCITY and it is created by using linear regression from Velocity/Exertion table. As we have shown above, velocity associated with a given rep-left-in-the-tank is really similar REGARDLESS of the load used (%1RM). This allows us to control and prescribe proximity to failure using the stop velocity concept. There are of course some deviations in a score, but that’s because there are slight differences between real values (mean between 85% and 70% set) and linear model.
Please bear in mind that you will not hit those exact velocities, but should strive to use them as a rule of thumb, that is individualized. Even the small changes in technique (e.g. touch and go vs. pause vs. dive-bombing in bench press/squat) will result in different velocities.
As a side note, I believe that MVT is pretty similar between the different techniques for a given individual, just the different techniques allow more weight to be used or more reps to be performed. In our example, using the individualized Load/Exertion table and Velocity/Exertion table estimated using a pause bench press and performing ‘dive-bombing’ on the chest will result in different scores. In this particular example, it will allow you more reps to be done or more weight to be used, but I believe once you hit failure or 1RM with that technique as well, your MVT will be pretty similar if not the same. And that is an idea fro another study or self-experiment.
In the next installment I will discuss more ideas and problems using a velocity-based approach and cover one relationship that might have slipped through the cracks.




Responses